This is my second post of a series which will cover how you can distribute your OpenShift cluster across multiple datacenter domains and increase availability and performance of your control plane.
Background
If you haven’t read it, please have a look at the first post.
Failure Domains
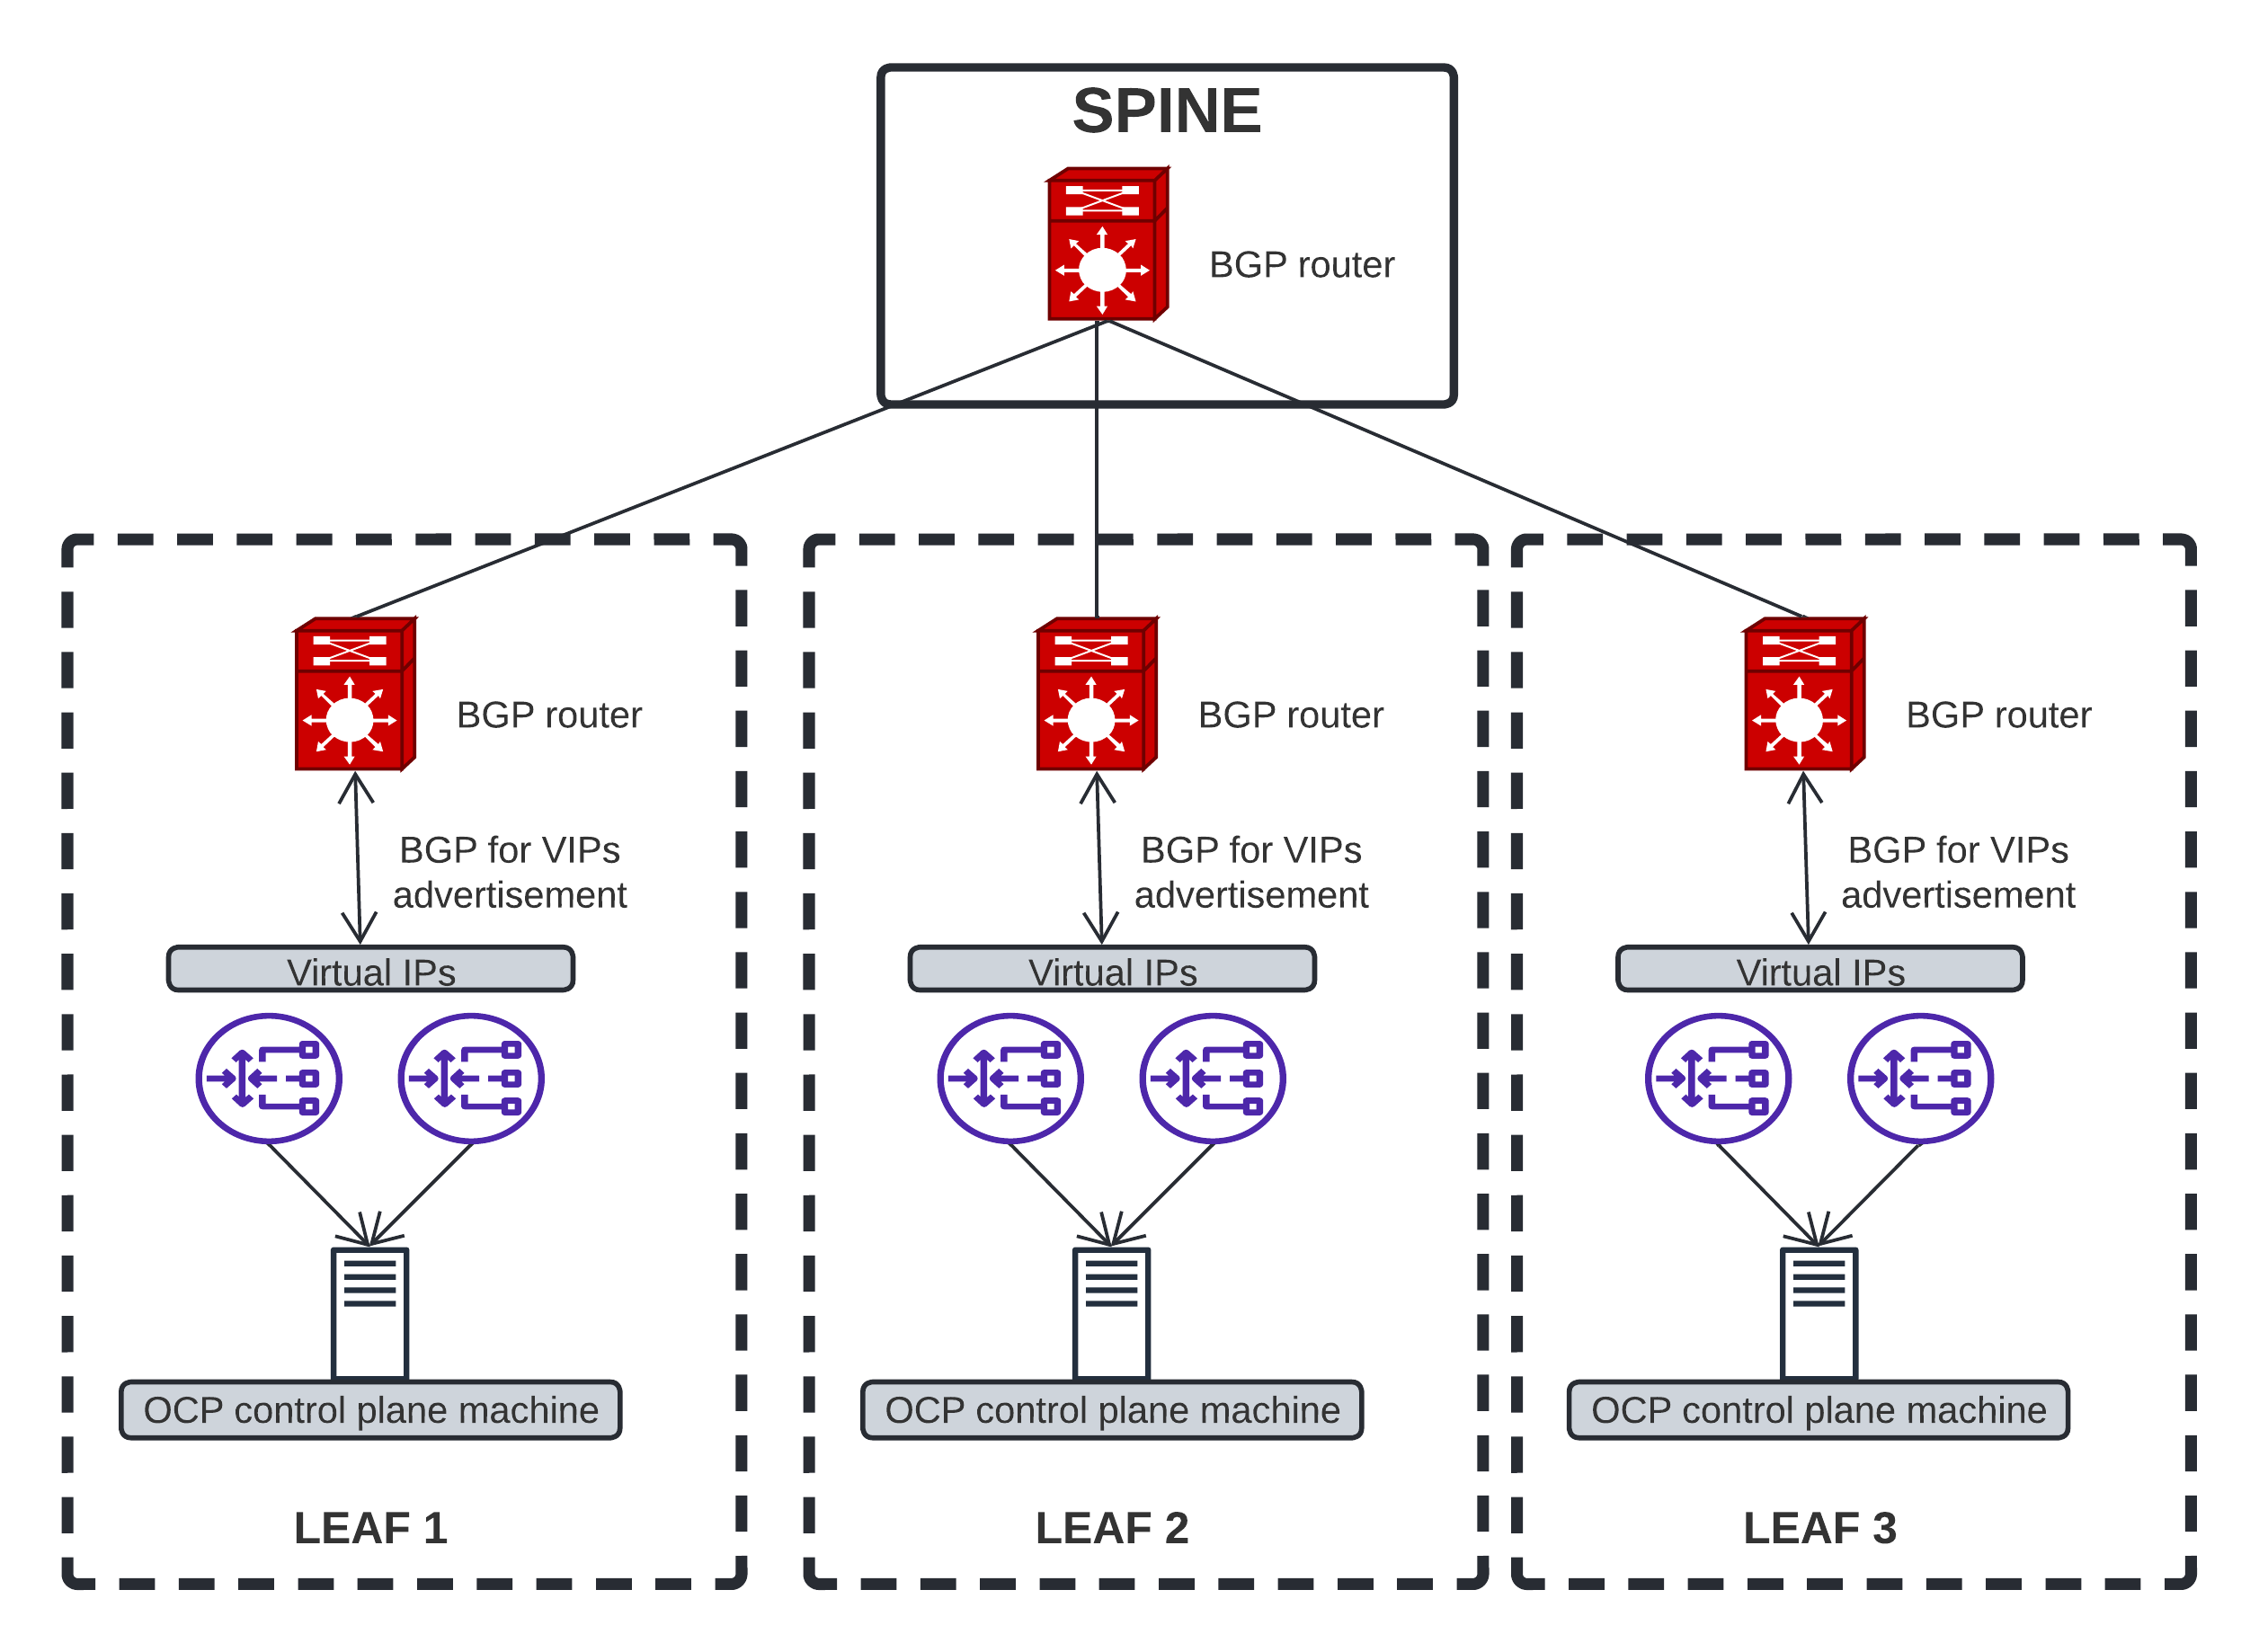
Failure Domains help to spread the OpenShift control plane across multiple (at least 3) domains where each domain has a defined storage / network / compute configuration. In a modern datacenter, each domain has its own power unit, network and storage fabric, etc. If a domain goes down, it wouldn’t have an impact on the workloads since the other domains are healthy and the services are deployed in HA.
In this context, we think that the SLA of OpenShift can significantly be increased by deploying the OpenShift cluster (control plane and workloads) across at least 3 domains.
In OCP 4.13, Failure Domains will be TechPreview (not supported) but you can still test it. We plan to make it supported in a future release.
If you remember the previous post, we were deploying OpenShift within one domain, with one external load balancer. Now that we have Failure Domains, let’s deploy 3 external LBs (one in each domain) and then a cluster that is distributed over 3 domains.
Pre-requisites
At least 3 networks and subnets (can be tenant or provider networks) have to be pre-created. They need to be reachable from where Ansible will be run. The machines used for the LB have to be deployed on CentOS9 (this is what we test).
Deploy your own Load-Balancers
In our example, we’ll deploy one LB per leaf, which is in its own routed network. Therefore, we’ll deploy 3 load balancers.
Let’s deploy!
Create your Ansible inventory.yaml file:
---
all:
  hosts:
    lb1:
      ansible_host: 192.168.11.2
      config: lb1
    lb2
      ansible_host: 192.168.12.2
      config: lb2
    lb3:
      ansible_host: 192.168.13.2
      config: lb3
  vars:
    ansible_user: cloud-user
    ansible_become: true
Create the Ansible playbook.yaml file:
---
- hosts:
    - lb1
    - lb2
    - lb3
  tasks:
    - name: Deploy the LBs
      include_role:
        name: emilienm.routed_lb
Write the LB configs in Ansible vars.yaml:
---
configs:
  lb1:
    bgp_asn: 64998
    bgp_neighbors:
      - ip: 192.168.11.1
        password: f00barZ
    services: &services
      - name: api
        vips:
          - 192.168.100.240
        min_backends: 1
        healthcheck: "httpchk GET /readyz HTTP/1.0"
        balance: roundrobin
        frontend_port: 6443
        haproxy_monitor_port: 8081
        backend_opts: "check check-ssl inter 1s fall 2 rise 3 verify none"
        backend_port: 6443
        backend_hosts: &lb_hosts
          - name: rack1-10
            ip: 192.168.11.10
          - name: rack1-11
            ip: 192.168.11.11
          - name: rack1-12
            ip: 192.168.11.12
          - name: rack1-13
            ip: 192.168.11.13
          - name: rack1-14
            ip: 192.168.11.14
          - name: rack1-15
            ip: 192.168.11.15
          - name: rack1-16
            ip: 192.168.11.16
          - name: rack1-17
            ip: 192.168.11.17
          - name: rack1-18
            ip: 192.168.11.18
          - name: rack1-19
            ip: 192.168.11.19
          - name: rack1-20
            ip: 192.168.11.20
          - name: rack2-10
            ip: 192.168.12.10
          - name: rack2-11
            ip: 192.168.12.11
          - name: rack2-12
            ip: 192.168.12.12
          - name: rack2-13
            ip: 192.168.12.13
          - name: rack2-14
            ip: 192.168.12.14
          - name: rack2-15
            ip: 192.168.12.15
          - name: rack2-16
            ip: 192.168.12.16
          - name: rack2-17
            ip: 192.168.12.17
          - name: rack2-18
            ip: 192.168.12.18
          - name: rack2-19
            ip: 192.168.12.19
          - name: rack2-20
            ip: 192.168.12.20
          - name: rack3-10
            ip: 192.168.13.10
          - name: rack3-11
            ip: 192.168.13.11
          - name: rack3-12
            ip: 192.168.13.12
          - name: rack3-13
            ip: 192.168.13.13
          - name: rack3-14
            ip: 192.168.13.14
          - name: rack3-15
            ip: 192.168.13.15
          - name: rack3-16
            ip: 192.168.13.16
          - name: rack3-17
            ip: 192.168.13.17
          - name: rack3-18
            ip: 192.168.13.18
          - name: rack3-19
            ip: 192.168.13.19
          - name: rack3-20
            ip: 192.168.13.20
      - name: ingress_http
        vips:
          - 192.168.100.250
        min_backends: 1
        healthcheck: "httpchk GET /healthz/ready HTTP/1.0"
        frontend_port: 80
        haproxy_monitor_port: 8082
        balance: roundrobin
        backend_opts: "check check-ssl port 1936 inter 1s fall 2 rise 3 verify none"
        backend_port: 80
        backend_hosts: *lb_hosts
      - name: ingress_https
        vips:
          - 192.168.100.250
        min_backends: 1
        healthcheck: "httpchk GET /healthz/ready HTTP/1.0"
        frontend_port: 443
        haproxy_monitor_port: 8083
        balance: roundrobin
        backend_opts: "check check-ssl port 1936 inter 1s fall 2 rise 3 verify none"
        backend_port: 443
        backend_hosts: *lb_hosts
      - name: mcs
        vips:
          - 192.168.100.240
        min_backends: 1
        frontend_port: 22623
        haproxy_monitor_port: 8084
        balance: roundrobin
        backend_opts: "check check-ssl inter 5s fall 2 rise 3 verify none"
        backend_port: 22623
        backend_hosts: *lb_hosts
  lb2:
    bgp_asn: 64998
    bgp_neighbors:
      - ip: 192.168.12.1
        password: f00barZ
    services: &services
  lb3:
    bgp_asn: 64998
    bgp_neighbors:
      - ip: 192.168.13.1
        password: f00barZ
    services: &services
In this case, we deploy OpenShift on OpenStack which doesn’t support static IPs. Therefore, we have to put all the available IPs from the subnets used for the machines, in the HAproxy backends.
Install the role and the dependencies:
ansible-galaxy install emilienm.routed_lb,1.0.0
ansible-galaxy collection install ansible.posix ansible.utils
Deploy the LBs:
ansible-playbook -i inventory.yaml -e "@vars.yaml" playbook.yaml
Deploy OpenShift
Here is an example of install-config.yaml:
apiVersion: v1
baseDomain: mydomain.test
compute:
- name: worker
  platform:
    openstack:
      type: m1.xlarge
  replicas: 1
controlPlane:
  name: master
  platform:
    openstack:
      type: m1.xlarge
      failureDomains:
      - portTargets:
        - id: control-plane
          network:
            id: fb6f8fea-5063-4053-81b3-6628125ed598
          fixedIPs:
          - subnet:
              id: b02175dd-95c6-4025-8ff3-6cf6797e5f86
      - portTargets:
        - id: control-plane
          network:
            id: 9a5452a8-41d9-474c-813f-59b6c34194b6
          fixedIPs:
          - subnet:
              id: 5fe5b54a-217c-439d-b8eb-441a03f7636d
      - portTargets:
        - id: control-plane
          network:
            id: 3ed980a6-6f8e-42d3-8500-15f18998c434
          fixedIPs:
          - subnet:
              id: a7d57db6-f896-475f-bdca-c3464933ec02
  replicas: 3
metadata:
  name: mycluster
networking:
  clusterNetwork:
  - cidr: 10.128.0.0/14
    hostPrefix: 23
  machineNetwork:
  - cidr: 192.168.11.0/24
  - cidr: 192.168.100.0/24
platform:
  openstack:
    cloud: mycloud
    machinesSubnet: 8586bf1a-cc3c-4d40-bdf6-c243decc603a
    apiVIPs:
    - 192.168.100.240
    ingressVIPs:
    - 192.168.100.250
    loadBalancer:
      type: UserManaged
featureSet: TechPreviewNoUpgrade
After the deployment, you’ll only have one worker in the first domain. To deploy more workers in other domains, you’ll have to create a MachineSet per domain (the procedure is well documented in OpenShift already).
Note that for each Failure Domain, you have to provide the leaf network ID and its subnet ID as well. If you deploy with availability zones, you’ll be able to provide them in each domain. The documentation for this feature is in progress and I’ll update this post once we have it published.
If you’re interested by a demo, I recorded one here.
Known limitations
- Deploying OpenShift with static IPs for the machines is not supported with OpenStack platform for now.
- Changing the IP address for any OpenShift control plane VIP (API + Ingress) is currently not supported. So once the external LB and the OpenShift cluster is deployed, the VIPs can’t be changed.
- Migrating an OpenShift cluster from the OpenShift managed LB to an external LB is currently not supported.
- Failure Domains are only for the control plane for now, and will be extended to the compute nodes.
Keep in mind that the features will be TechPreview at first and once it has reached some maturity, we’ll promote them to GA.
Wrap-up
In this article, we combined both exciting features that will help to increase your SLA and also improve the performances not only on the control plane but also for the workloads.
We have already got positive feedback from various teams, who tested it at a large scale and demonstrated that in this scenario, OpenShift is more reliable, better load-balanced and distributed in case of failure.
In a future post, I want to cover how you can make your workloads more reliable by using MetalLB as a load balancer in BGP mode.
I hope you liked it and please provide any feedback on the channels.